Clumpy lashes may be having a moment, but I've always been partial to a more natural-looking approach when it comes to maximizing my lashes. So instead of idolizing those with a heavy-handed mascara approach, like a Twiggy or Kim Kardashian, Audrey Hepburn has always been my doe-eyed idol.
While Hepburn liked to darken, plump, and lengthen like the best of 'em, she had one trick to ensure that her lashes looked naturally fanned-out and clump-free—and it wasn't a magic mascara wand. After applying a layer of mascara, her makeup artist Alberto de Rossi would take a pin and meticulously separate every. single. lash.

Yes, it's a painstaking—the average upper eyelid has an average of 70 to 150 lashes—and potentially dangerous process because, ouch. But, in my mind, it's a small price to pay on the quest for Hepburn's timeless gaze. So, recently, I asked makeup artist Joseph Carrillo to give me the same treatment with his clump-busting tool of choice: a sewing pin. It took about 5 minutes per set of lashes (10 very careful minutes in total) and suffice it to say, a tiny silver pin has officially become a staple of my tightly-edited makeup bag. Here's how it went down:
Step 1: Curl and Coat

Before you get pin-happy, curl your lashes as you normal would, if at all. Carillo used Shu Uemura's cult-favorite eyelash curler to amp things up before applying two coats of Dior Diorshow Extase Mascara.
Step 2: Separate Lashes with a Pin

Start at the base near the waterline and pull the pin through to the top, separating each individual lash. This defines each lash, as well as helps distribute the dark mascara pigment more evenly. Once you complete the first eye, repeat on the next and proceed to your lower lid lashes if you'd like.
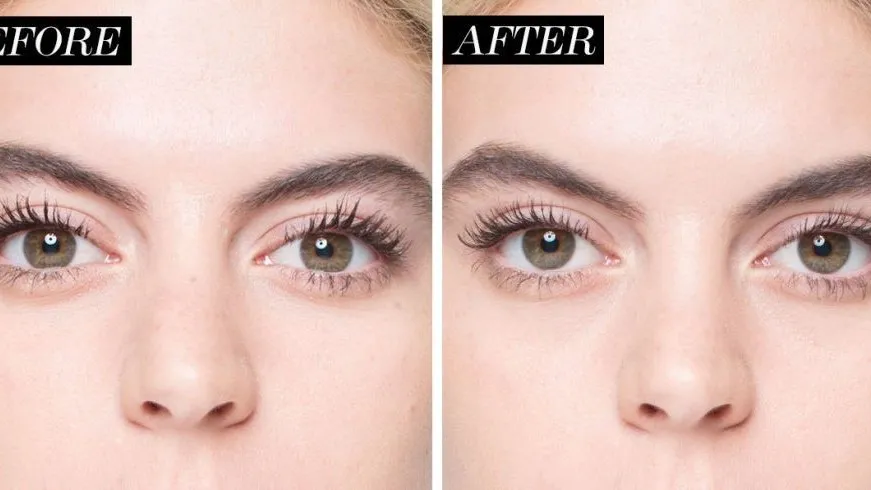
Step 3: Voilà!

As you can see, my lashes are clump-free for an overall more natural, yet equally impactful look à la Hepburn.
Editors' Note: If you're fearful that you don't have the time or that the odds are stacked against you not to stab yourself in the eye, I feel you. In that case, use the pin on the clumpiest sections instead of each individual lash *or* try an eyelash comb to brush-through lashes all at once.